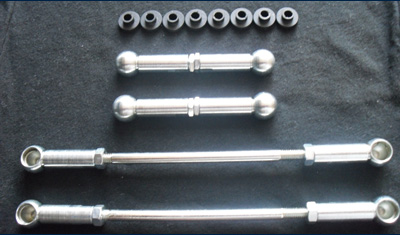
R231 SL senkesett – ABC demping (active body control)
2 399,00 kr
Dette unike produktet gir deg mulighet til å senke din luftfjærede R231 SL Mercedes uten å gjøre elektroniske inngrep. Operasjonen er fullt reversibel. Senker trinnløst opp til 50mm! Anbefales! Systemet funger ved å etter justering lure bilens nivåsensor til å tro at den sitter høyere enn den gjør. Dette vil forårsake at bilen automatisk senker seg etter fabrikkens gitte verdier. Ikke noe hokus pokus eller omfattende ombygginger. Alle luftfjæringens funksjoner will holdes inntakt. Både ABC, heving og senking. Bilen vil bli sportsligere og fastere og det reduserte tyngdepunktet vil gi deg en smidigere bil. Du trenger en jekk, fastnøkler og en tang. Enhver bil bør få hjulstillingen korrigert etter senking er foretatt.
**Make sure your car is on a flat surface while installing your linkages and remove the key from the ignition and no power is on remembering not leave your keys in the car.**
Tools Required –Adjustable spanner and large flat ended screwdriver.
Front:
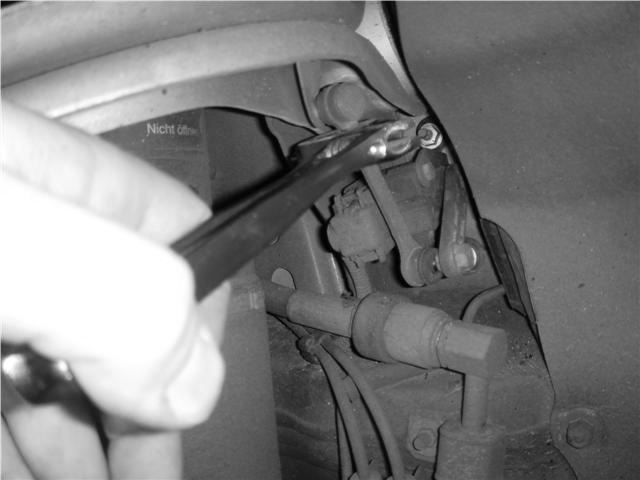
- Select the highest suspension setting and jack the vehicle up by a few inches to locate the ride height sensor which is under the wheel arch as per the picture below.
- Carefully Remove the standard linkage (**BE GENTLE, DO NOT DAMAGE OR SNAP THE SENSORS ARM!**)
- Fit a Rubber Grommet to each ball stud to ensure the ball and ball joint are protected from the elements.
- Install the adjustable linkages by firstly removing the safety retaining clips and then firmly pushing the ball joints of the linkage onto the ball studs on the bracket and sensors arm. The vehicle will lower by approximately 28mm for every 5mm longer you make the adjustable linkages than that of the standard linkages. We suggest making the link 8mm longer than the OEM link.
- Once you have achieved the desired ride height re-attach the safety clips.
- Now remove the jack and lower the car.
Rear:
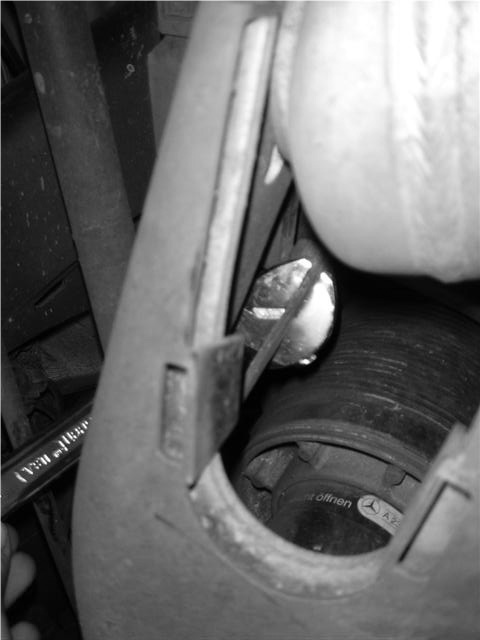
- Select the highest suspension setting and jack up the rear of the vehicle locate the ride height sensor as per the picture below.
We suggest that you do not remove the rear wheels and don’t jack up the car so that wheel leaves the ground as it is possible, although awkward to remove the rear linkage without doing so. You will be able to reach the linkage by positioning yourself under the corner of the rear bumper.
We understand this part of the install is awkward but it will avoid the new linkage catching the wishbone during its installation and save any potential damage to the sensor
- Carefully Remove the standard linkage (**BE GENTLE, DO NOT DAMAGE OR SNAP THE SENSORS ARM!**)
- Fit a Rubber Grommet to each ball stud to ensure the ball and ball joint are protected from the elements.
- Install the adjustable linkages by firstly removing the safety retaining clips and then firmly pushing the ball joints of the linkage onto the ball studs on the bracket and sensors arm. We suggest that you fit the shorter ball joint of the linkage to the mounting point on the wishbone. The vehicle will lower by approximately 28mm for every 5mm Shorter you make the adjustable linkages than that of the standard linkages. We suggest making the link 8mm longer than the OEM link.
- Once you have achieved the desired ride height re-attach the safety clips.
- Now remove the jack and lower the car.
Initializing the adjusted suspension:
- Start the vehicle whilst on a level surface and select the highest suspension setting (Access mode or similar) and leave the engine running to allow the cars suspension computer to settle to the new adjustments and compression to build in the air system.
- After leaving the car for a few minutes you can now select the sport suspension mode which will lower the vehicle.
- Check the vehicle is at the desired height in the suspension setting you have selected but ensure that the suspension is not so low that it may cause the wheels to rub on the wheel arches as this may cause damage to your tyre or wheel arch. It may take a couple attempts to get the linkage lengths correct to obtain the exact ride height of your liking.
Returning the vehicle to standard:
To return the car back to standard simply repeat the steps using the original linkages. As the standard joints harden with age you may find them hard to put back on. If this is the case apply some lubricant (WD40 or similar silicon based product) to the ends and squeeze them on with pliers.


